 (Image source: Midjourney)
 Tired of uninspiring, store-bought décor? Looking for a way to add personality to your home while staying eco-conscious? Upcycling might just be the creative outlet you’re searching for! By giving new life to old, forgotten items, you can create unique, stylish pieces that are kinder to the planet and packed with character.
From transforming old ladders into bookshelves to turning tin cans into striking pendant lights, this guide will inspire you with original upcycling projects that are both innovative and approachable. Whether you’re a seasoned crafter or a DIY beginner, these ideas will have you rethinking what’s possible with items you already own or can source for next to nothing.
1. Old Suitcase to Chic Storage
Turn an old hard-shell suitcase into stylish and functional storage that doubles as a conversation piece. This works perfectly for storing linens, seasonal clothes, or even kids’ toys.
What You’ll Need:
- A vintage suitcase (look for these at thrift stores or online marketplaces)
- Wooden legs (available from hardware stores or salvaged furniture)
- Drill and screws
- Sandpaper
- Paint or varnish (optional)
Instructions:
- Clean the Suitcase: Start by thoroughly cleaning the suitcase inside and out. Sand any rough spots, especially if you plan to paint or varnish it.
- Add Legs: Drill holes into the bottom corners of the suitcase and carefully screw in the wooden legs. For a modern look, try tapered, mid-century-style legs.
- Paint or Decorate (Optional): If you want a vibrant or clean look, paint the suitcase in a bold color or sand it down for a distressed, vintage vibe.
- Style It: Place it at the foot of your bed or use it as a side table with hidden storage.
Pro Tip: Line the inside with patterned fabric or stick-on wallpaper for an extra pop of personality.
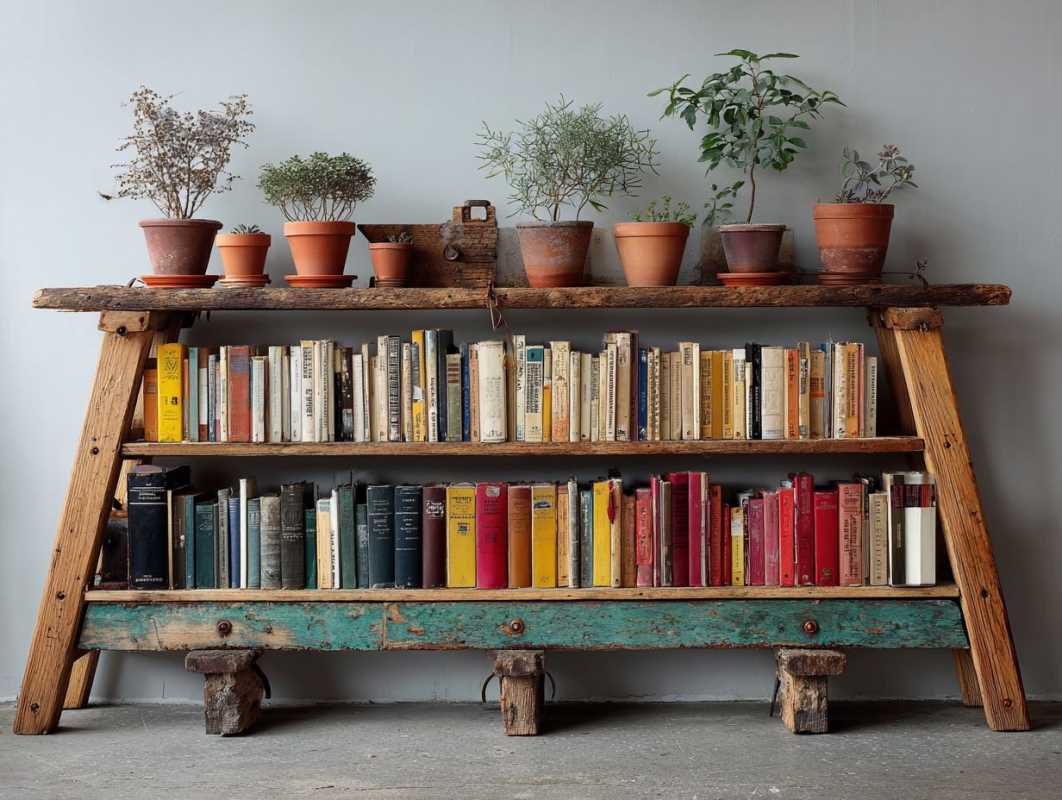
2. Ladder to Bookshelf
Old wooden ladders, either straight or A-frame, can easily find a second life as unique, rustic bookshelves perfect for displaying books, plants, or knick-knacks.
What You’ll Need:
- A wooden ladder (try flea markets or garage sales)
- Sandpaper
- Varnish or paint
- Wooden planks (cut to size)
- Screws or strong adhesive
Instructions:
- Prep the Ladder: Sand any rough edges, removing old paint or splinters. Finish it with varnish or paint to suit your home décor style.
- Add Shelves:
- For straight ladders, secure horizontal wooden planks between the rungs using screws or adhesive to create shelves.
- For A-frame ladders, simply lay wooden planks across the steps without additional fastening (gravity will do the job). Adjust the shelf width for stability.
- Style It:
- Use it as a display for books, vintage treasures, or small potted plants.
- For narrow spaces, this also works as a towel holder in a bathroom or blanket storage in a living room.
Pro Tip: Add fairy lights or hang small planters along the ladder’s frame for an extra whimsical touch.
3. Tin Can Pendant Lights
Tin cans may seem destined for the recycling bin, but with a little imagination, they can be morphed into stunning, industrial-chic pendant lights that add character to any room.
What You’ll Need:
- Empty tin cans (soup or coffee cans work great)
- Spray paint (matte black, metallic, or any color you love)
- Power drill with metal bits
- Pendant light cord kit
- Bulbs (Edison bulbs create a warm, vintage glow)
Instructions:
- Clean and Prep:
- Remove labels and glue from the tin cans, and thoroughly clean them.
- Use your drill to make a hole in the center of the can’s base (big enough for the light cord to pass through).
- Customize (Optional): Create a design by drilling extra small holes or patterns into the can’s sides, allowing light to shine through decoratively.
- Paint It:
- Spray the outside in your chosen color or finish for a stylish effect. Allow to dry completely.
- Attach the Light Cord:
- Thread the pendant light cord through the hole and secure it according to the kit’s instructions.
- Attach the bulb and test to ensure it’s working.
- Install and Hang:
- Mount the finished pendant light over a dining table, kitchen island, or cozy reading nook for a touch of upcycled charm.
Pro Tip: Group several tin can lights in varying heights for a geometric chandelier effect.
4. Mason Jar Window Herb Garden
Transform ordinary mason jars into a charming vertical herb garden for your kitchen or patio. This project doesn’t just save space but also ensures your herbs are fresh and within reach.
What You’ll Need:
- Mason jars (clear or tinted for extra flair)
- Mountable wooden plank
- Hose clamps (to hold the jars in place)
- Screws and drill
- Potting soil and herbs (basil, parsley, mint, etc.)
Instructions:
- Mount the Jars:
- Use a drill to attach the hose clamps to the wooden plank where you want the jars to sit.
- Insert the mason jars into the clamps and tighten them securely.
- Plant Herbs:
- Fill each jar with potting soil and plant your herbs. Be sure to include small drainage rocks at the bottom of the jars if there are no holes.
- Hang It:
- Secure the wooden plank to a wall or window frame with sturdy screws. If mounting indoors, choose a sunny spot.
Pro Tip: Paint or stencil the wooden plank with the names of your herbs for a personalized touch.
5. Wine Cork Bulletin Board
If you’ve been collecting wine corks but aren’t sure what to do with them, this project offers a practical yet decorative solution. Create a rustic bulletin board that’s perfect for displaying notes, photos, and reminders.
What You’ll Need:
- Wine corks
- Shadow box frame or plain wooden board
- Hot glue gun
- Paint or stain (optional)
Instructions:
- Prepare the Corks:
- Arrange the corks in your desired pattern (horizontal, vertical, herringbone, etc.) before gluing them down.
- Glue Them Down:
- Secure each cork to the shadow box or board with a hot glue gun, working carefully to avoid gaps.
- Customize (Optional):
- Paint or stain the frame and add decorative accents like twine or small faux greenery.
- Hang It:
- Attach hooks or adhesive strips and display the bulletin board in your kitchen, office, or entryway.
Pro Tip: Use corks with interesting logos or winery names facing outward for added charm.